How to Safely Remove Gel Polish at Home Without Damaging Your Nails
We’ve all been there. You’re sitting on the couch, watching your favorite show, and your eyes drift down to your hands. There it is: a tiny, innocent-looking lift at the corner of your two-week-old gel manicure. It is incredibly tempting to slide your fingernail under that loose edge and peel the entire sheet of polish off in one satisfying tug. But before you do, take a deep breath and step away from the nail! Peeling off your gel polish is essentially a declaration of war on your natural nails. Fortunately, you don’t have to run to the salon and spend your hard-earned cash just to get it off. You can absolutely achieve a safe, damage-free gel removal right in the comfort of your own home, and we are going to show you exactly how to do it.
The Temptation of the Peel: Why We Need to Talk About Gel Removal
Let’s be honest: there is something strangely therapeutic about peeling things. But when it comes to gel polish, that satisfying peel is a massive illusion. When gel polish cures under a UV or LED light, it doesn't just sit on top of your nail like regular polish does. It fuses to the microscopic crevices of your nail plate.
When you forcibly rip that gel off, you aren't just removing the polish; you are tearing away the top layers of your natural nail’s keratin. This leaves your nails looking paper-thin, peeling, and feeling incredibly sensitive to the touch. If you’ve ever had nails that felt like they were "breathing" or throbbing after removing gels, improper peeling is almost always the culprit. Taking the time to remove your gel polish safely at home is the ultimate act of self-care for your hands.
—
The Anatomy of a Gel Manicure
To understand how to take gel off safely, we first need to understand what we are dealing with. Gel polish is a marvel of modern cosmetic chemistry, but its strength is also its stubbornness.
How Gel Differs from Regular Polish
Regular nail polish dries through evaporation. The solvents in the liquid evaporate into the air, leaving behind a hard layer of pigment and resin. Gel polish, on the other hand, doesn't dry—it cures.
Gel is formulated with photo-reactive ingredients called photoinitiators. When exposed to specific wavelengths of UV or LED light, these chemicals undergo a process called polymerization. They link together to form a highly dense, cross-linked plastic network. This network is what gives gel its famous chip-free, high-shine durability that can easily last up to three weeks.
Why Improper Removal Ruins Your Natural Nails
Because of this intense cross-linked structure, gel polish is highly resistant to casual wear and tear, water, and standard nail polish removers. If you try to scrape or peel it off without chemically breaking those cross-links first, the bond between the gel and your nail plate is often stronger than the bond between the layers of your natural nail. You will inevitably pull up your nail's natural structure, leading to weak, brittle, and splitting nails that can take months to grow out.
—
Gathering Your DIY Gel Removal Toolkit
Before you begin, you need to set up your battle station. Trying to wing it with the wrong tools is a recipe for frustration and potential nail damage. Here is everything you need to gather before you start.
The MVP: Pure Acetone (And Why Alternatives Don't Cut It)
If there is one non-negotiable item in your kit, it is 100% pure acetone. Do not try to use "regular" nail polish remover, "strengthening" formulas, or acetone-free alternatives.
Regular removers are diluted with water, oils, and other conditioning agents. While they are great for traditional lacquer, they simply aren't strong enough to break down the polymerized network of cured gel. Using them will only result in you soaking your hands for an hour with zero results, which actually dries out your skin more than a quick, concentrated soak in pure acetone.
The Supporting Cast: Buffers, Foils, and Foils' Best Friends
To make this process seamless, gather these supporting tools:
- A coarse nail file (100/180 grit): Crucial for breaking the shiny topcoat barrier.
- Cotton balls or cotton pads: Cotton balls are preferred because they hold more liquid than flat pads.
- Aluminum foil: Cut into ten squares (about 3×3 inches each) large enough to wrap securely around your fingertips.
- An orange wood stick or a cuticle pusher: Wood is gentler on the nail plate than metal.
- Cuticle oil or petroleum jelly (Vaseline): Your shield against the drying power of acetone.
- A rich hand cream: To restore moisture afterward.
—
Step-by-Step: The Safe At-Home Gel Removal Method
Now that your tools are laid out, it’s time to get to work. Put on your favorite podcast, grab a cup of tea, and let’s walk through this step-by-step.
Step 1: Breaking the Seal (Filing the Topcoat)
The very first layer of your gel manicure is the topcoat. This is the shiny, impenetrable armor designed to resist scratching and chemical damage. If you skip this step, the acetone will slide right off the nail without penetrating the color layers underneath.
Take your coarse nail file and gently buff the surface of each nail. Your goal here is not to file off all the polish, but simply to remove the shine. You want a dull, chalky look on every nail. Be careful not to file too deeply—stop as soon as the shine is gone so you don’t accidentally file down to your natural nail.
Step 2: Protecting Your Cuticles
Acetone is incredibly effective, but it is also a notorious moisture thief. It will strip the natural oils from your skin and cuticles, leaving them looking white, dusty, and prone to painful hangnails.
To prevent this, apply a generous layer of cuticle oil, olive oil, or petroleum jelly to the skin surrounding your nails and your fingertips. Be careful not to get too much on the nail surface itself, as this can create a barrier that blocks the acetone from doing its job on the polish.
Step 3: The Soak-Off Process (The Foil Method)
This is where the magic happens. Tear your cotton balls into pieces that are just large enough to cover your nail bed.
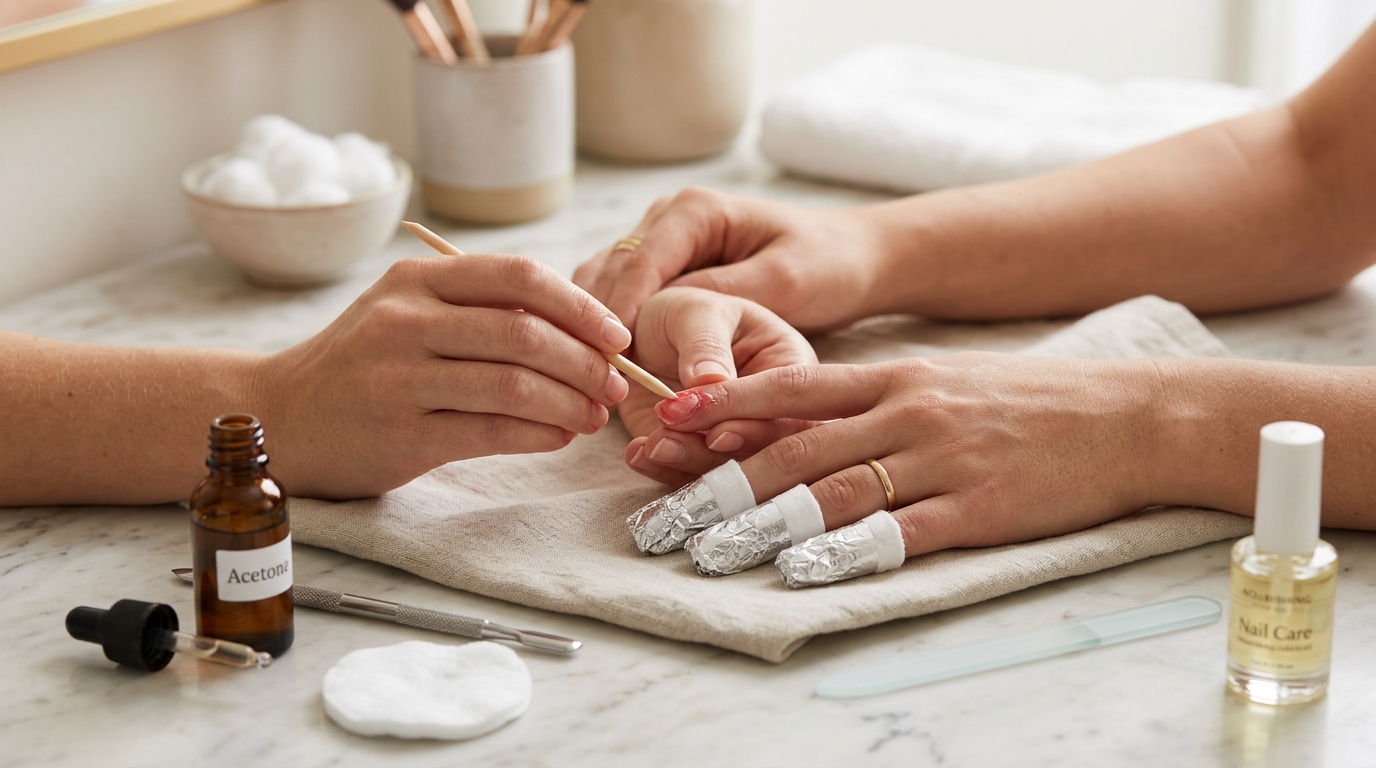
Soak a piece of cotton thoroughly in the 100% pure acetone. Place the wet cotton directly on top of your buffed nail. Next, take one of your pre-cut foil squares and wrap it tightly around your fingertip. The foil serves two purposes: it holds the acetone-soaked cotton in place, and it traps your body heat, which speeds up the chemical reaction.
Pro-Tip: Keeping Your Hands Warm for Faster Results
If you want to speed up the process and make it even more effective, wrap your hands in a warm, dry towel once all ten fingers are wrapped in foil. Alternatively, you can slip on a pair of winter gloves or oven mitts over the foil. The added warmth helps the acetone break down the gel bonds much faster, saving you valuable time.
Step 4: The Waiting Game (Patience is a Virtue)
Now, we wait. This is the hardest part for most people, but patience is absolutely vital. Set a timer for 15 minutes.
Do not be tempted to slide the foils off early to check on the progress. Every time you open a foil wrap, you let the acetone evaporate and cool down, which resets the clock on the softening process. Use this time to relax, watch a show, or practice your hands-free meditation.
Step 5: The Gentle Slide-Off
Once 15 minutes have passed, choose one finger to test. Press down gently on the foil wrap and slide it off your finger in a pulling, twisting motion.
If the process worked successfully, the gel polish should look cracked, lifted, and crumbly—almost like peeling paint on an old building. Take your wooden orange stick and gently nudge the softened gel away from your cuticle toward the free edge of your nail. It should slide off with almost zero resistance.
What to Do If the Gel Won't Budge
If you encounter resistance, or if the gel is still firmly attached to your nail plate, do not scrape it off. Scraping hard with a wooden or metal tool will gouge your natural nail.
Instead, immediately re-saturate the cotton pad with acetone, wrap your finger back up in the foil, and wait another 5 to 7 minutes. Some gel formulas are highly pigmented or thicker than others, and they simply need a little extra time to dissolve.
—
Alternative Method: The Steam-Off Machine (Is It Worth It?)
If you are a frequent gel polish wearer, you might have seen the trendy gel-steaming machines popping up all over social media. These devices warm up acetone inside a chamber, allowing you to insert your fingertips and let the heated vapor dissolve the gel.
Are they worth it? Generally, yes! They are highly convenient, eliminate the need for messy foil wrapping, and the warmth of the steam breaks down the gel incredibly fast (often in under 10 minutes). However, they still expose your fingertips to concentrated acetone vapor, so proper post-removal hydration is still absolutely essential. If you remove your gels at home twice a month, investing in a steam-off machine can be a fantastic time-saver.
—
The Post-Removal Rehab: Feeding Your Nails Back to Health
Once all the gel is successfully removed, your natural nails might look a little sad. They will likely have some powdery white residue and feel dry. Don't panic—this is temporary dehydration, not permanent damage. Now is the time to pamper them.
Rehydration Station: Cuticle Oils and Creams
Wash your hands thoroughly with warm water and a gentle, moisturizing soap to remove any lingering acetone. Once your hands are dry, it’s time to flood them with moisture.
Apply a high-quality cuticle oil to your nail beds and massage it in. Look for oils that contain jojoba oil, sweet almond oil, or vitamin E. Jojoba oil is particularly incredible because its molecular structure is small enough to actually penetrate the nail plate and deeply hydrate it, whereas heavier oils just sit on top. Follow up with a thick, nourishing hand cream to lock in that moisture.
To Polish or Not to Polish? The Nail Breather Myth
You might have heard the old advice that you need to let your nails "breathe" between manicures. Let's bust this myth: nails are made of dead keratin cells, so they don't actually breathe! They get all their oxygen and nutrients from the blood supply flowing to the nail bed underneath.
However, taking a break from polish for a few days to a week is still a great idea. It gives you a window to intensely hydrate the nail plate with oils and creams without any barriers, helping to strengthen the bonds between the keratin layers and prevent peeling.
—
Common Mistakes to Avoid at All Costs
Even with the best intentions, it's easy to make a misstep during at-home removal. Keep these common blunders in mind so you can steer clear of them.
The Scraping Sin
We cannot stress this enough: never scrape hard. If you find yourself using force with your orange stick, the gel is not ready to come off. Pushing too hard can scrape away the delicate layers of your nail bed, leaving permanent ridges and weak spots that will take months to grow out.
Using the Wrong File Grit
Using an extremely coarse file (like an 80-grit file meant for acrylic extensions) on your natural nail can thin it out in seconds. Conversely, using a soft, fine buffer to break the topcoat won't scratch the surface enough for the acetone to get inside. Stick to a standard 100/180-grit file, and use it only on the gel layer, never on your bare natural nail.
—
When to See a Professional
While most gel manicures can be safely removed at home, there are times when you should step away and visit a professional salon.
If your manicure consists of hard gel (builder gel) or acrylic extensions rather than soft soak-off gel, acetone will not dissolve it. Hard gels must be carefully filed off using an electric file (e-file). Attempting to scrape or file hard gel off at home without professional training can easily result in filing straight through your natural nail bed, causing severe pain and long-term damage. When in doubt, ask your nail tech what product they used so you know the proper removal method.
—
Conclusion
Removing your gel polish at home doesn't have to be a stressful chore, nor does it have to ruin your natural nails. By gathering the right tools, protecting your skin, and practicing a little bit of patience, you can maintain strong, healthy, beautiful nails while enjoying the convenience of DIY care. Remember, the secret to gorgeous nails isn't just the polish you put on—it’s how gently you treat them when the polish comes off. Treat your hands with love, keep that cuticle oil close by, and happy pampering!
—
Frequently Asked Questions
1. Can I remove gel polish with regular nail polish remover if I soak it longer?
No. Regular nail polish remover is diluted and formulated for traditional lacquer. It will not break down the chemical bonds of cured gel polish, even with extended soaking. You must use 100% pure acetone for safe and effective removal.
2. How long does it take for nails to recover after removing gel?
If removed safely using the method above, your nails shouldn't need a recovery period! However, if they feel dry or slightly weak, a week of intense hydration with a jojoba-based cuticle oil will restore their strength and flexibility.
3. Can I use olive oil instead of cuticle oil?
Absolutely! Olive oil, coconut oil, and sweet almond oil are excellent natural alternatives for hydrating your cuticles and nail plates after using drying acetone.
4. Why did my nails turn white after removing the gel?
The white, chalky appearance is simply severe dehydration caused by the acetone. It is not permanent damage. Applying a rich cuticle oil and hand cream will immediately restore their natural shine and color.
5. Can I use a metal cuticle pusher to scrape off the gel?
While you can use a metal pusher, you must be extremely gentle. Metal is much harder than your natural nail plate and can easily scrape away healthy nail layers if too much pressure is applied. A wooden orange stick is highly recommended for beginners because it is much softer and safer.
Post Comment